สำหรับท่านที่เป็นแฟนพันธุ์แท้และชื่นชมในการเขียนโปรแกรมพัฒนาไมโครคอนโทรลเลอร์ด้วยภาษาอาดุยโน โดยการใช้ Arduino Sketch แล้วต้องการไปพัฒนาไมโครคอนโทรลเลอร์ตระกูลอื่น ในที่นี้จะยกตัวอย่างบอร์ดที่เป็นที่นิยมกันมากคือ STM32F4 Discovery มีขั้นตอนในการพัฒนาดังน่ี้
- ดาวน์โหลดและติดตั้งอาดุยโนสเกตเวอร์ชันล่าสุด ในที่นี้ใช้เวอร์ชัน 1.8.5
- เลือกเมนู Tools>Board:>Boards Manager…
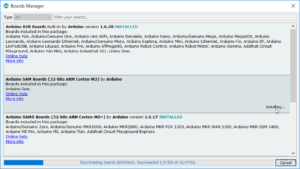
- เลือก Arduino SAM Boards แล้วคลิก Install รอจนติดตั้งเสร็จตามภาพ
- หลังจากติดตั้งเสร็จแล้ว ให้เข้าไปโหลดไฟล์ Arduino_STM32-master.zip ได้จากที่นี่
- โหลดไฟล์มาได้แล้วแตกซิปออก สร้างโฟลเดอร์ Arduino_STM32
- ย้ายโฟลเดอร์ไปไว้ตามพาธ My Documents/Arduino/hardware (ถ้าโฟลเดอร์ hardware ไม่มีให้สร้างขึ้นใหม่)
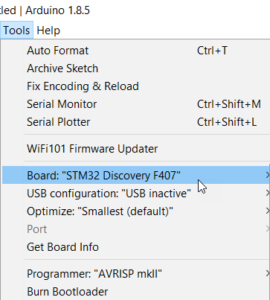
- รีสตาร์ทอาดุยโนสเกต แล้วเข้าไปที่ที่เมนู Tools เพื่อเลือกบอร์ด STM32 Discovery F407 ตามภาพ ค่าออปชั่นอื่น ๆ ไม่ต้องเปลี่ยนแปลง ไม่ต้องเลือก Port
- ทดลองโปรแกรมไฟกระพริบโดยคัดลอกโค้ดตัวอย่างไว้ที่สเกต save file แล้วตั้งชื่อเป็น stm32f4_blinkled
/*
* STM32F4-DISCOVERY
* Example 1: LEDs
*/
void setup() {
// put your setup code here, to run once:
// Set the MCU’s pin data direction.
pinMode(PD13, OUTPUT);
pinMode(PD14, OUTPUT);
pinMode(PD15, OUTPUT);
pinMode(PD12, OUTPUT);
// Set all outputs LOW to have all LED’s initially turned off.
digitalWrite(PD13, LOW);
digitalWrite(PD14, LOW);
digitalWrite(PD15, LOW);
digitalWrite(PD12, LOW);
}
void loop() {
// put your main code here, to run repeatedly:
// Turn off the GREEN LED, turn on the ORANGE LED and wait for 1000ms.
digitalWrite(PD12, LOW);
digitalWrite(PD13, HIGH);
delay(500);
// Turn off the ORANGE LED, turn on the RED LED and wait for 1000ms.
digitalWrite(PD13, LOW);
digitalWrite(PD14, HIGH);
delay(500);
// Turn off the RED LED, turn on the BLUE LED and wait for 1000ms.
digitalWrite(PD14, LOW);
digitalWrite(PD15, HIGH);
delay(500);
// Turn off the BLUE LED, turn on the GREEN LED and wait for 1000ms.
digitalWrite(PD15, LOW);
digitalWrite(PD12, HIGH);
delay(500);
// The code in the “loop()” statement will automatically repeat.
}
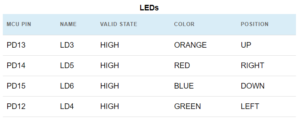
- รายละเอียดของพอร์ตและการเชื่อมต่อกับ LED ของบอร์ด Discovery ตามภาพด้านล่าง
- ทดลองสั่งคอมไพล์ แล้วโหลดโปรแกรมลงบอร์ด
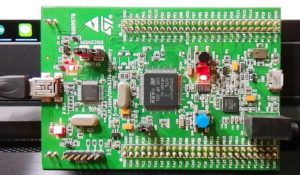
- จะเห็นไฟวิ่งตามเข็มนาฬิกาดังภาพ
แหล่งความรู้อ้างอิง
https://github.com/rogerclarkmelbourne/Arduino_STM32/wiki/Installation
